SETTING UP THE BIG DAY - THE COCKTAIL EDITION
How to create the perfect ‘Plan of Attack’
Setting up your big day? Keeping it a cool, cocktail style? Well no problem!
Our experienced stylists have put together a step by step guide to help ensure your setup runs smoothly. And remember, should you need further advice we’re always here to answer any further questions.
STEP 1 - IDENTIFY YOUR HELPERS
Your helpers are your “doers”. Think of them as your extra hands for the big day. As you’ll be busy (getting married, having photos etc), this gang will be taking care of the tasks you just won’t have time to do, like styling your event. If you don’t have any yet, start putting your feelers out! Friends and fam are always keen to be a part of your special day.
STEP 2 - LISTS ARE YOUR FRIEND
Print a list of your styling elements with notes on where each item will be located. We like tables, but whatever works for you!
Print copies of the above for your helpers.
Example of Styling checklist
STEP 3 - DELEGATING IS VITAL
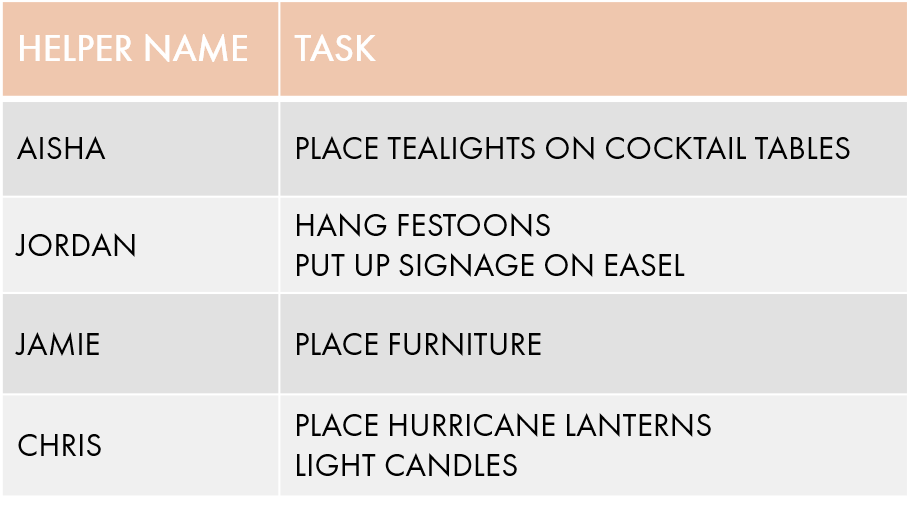
Make a list of who your helpers are, with their respective allocated tasks. Be smart about this - e.g. If Auntie Jen works in a café, then ask her to take care of the bar styling. If cousin Jamie is an electrician, they’re your perfect person to pop up the ladder & set up the festoon lights. Keep in mind, if you have several people helping on the day (and yay for you), this can also be overwhelming as EVERYONE will be asking you questions. So, come prepared - Put your helpers into little teams and make sure one person per team leads the others. *Insert sigh of relief already!
Example of Delegation checklist
STEP 4 - VISUAL AIDS ALWAYS HELP
Did you have a consultation with us? If so, print out the snaps you took of your setup and give these to your helpers - this way they are clear on how things should look.
If you don’t have photos then set up ONE as an example, exactly as you’d like it to look - your gang can then just easily copy it!
STEP 5 - COMPLETE A WALK-THROUGH
Once you have your helpers all in one place, take them for walk-through of the venue and the areas they’ll be setting up. Point out each area, important info they need to know, along with explaining what needs to be done. Now, you’re all on the same page & it gives your helpers a chance to ask any questions. Speak now, or forever hold your peace. ;)
STEP 6 - PREP, PREP, PREP
Minimise work and the rush! Unpack all boxes of product on arrival and store the packaging. So much easier to have everything unpacked before you start setting up.
Test all lights and battery-operated candles to make sure they work (we test before we pack, but you never know what may happen in transit).
Have a florist coming in? Place your vases where they’re meant to go and fill with water. This way your florist can just place your floral arrangements straight into the vases & they’re ready to go!
STEP 7 - FURNITURE PLACEMENT
Remember to think about spatial awareness, i.e. Try not to overcrowd cocktail tables or attempt to add too many lounges around coffee tables. Yes, you want seating but you also need room for guests to move about. And even though the venue may offer more cocktail tables, don't get over excited - at the end of the day, cocktail tables are there for your guests to put their drinks down.
We suggest mapping out the larger pieces of furniture before placing them. Sticky notes can be handy for this! Think about social distancing measures when you consider where to place your furniture. If you’re still unsure, ask your venue contact - they usually have a good idea of what does/doesn’t work in their spaces.
Ask your venue contact or caterer for any requirements, i.e. If you’re placing your bar, do they need it close to kitchen so waitstaff can easily replenish drinks/ice?
Remember to think about all types of guests - often people like a quieter area away from loud music. Lounge pods are great for this & create a warm, welcoming and comfy vibe.
STEP 8 - DON’T GET TOO ‘YOLO’
Beware the common mistake & don’t drink too early! Although sometimes a fun celebratory motivator, alcohol can of course, affect your judgement. We suggest saving the celebrations to once you’re finished. It’s important to remain safe (people may be going up ladders etc) AND celebrate your gang’s help, too.
STEP 9 - LIGHT IT UP
Remember if you have candles and lighting, to ask your venue or caterer to light them or switch them on before your guests arrive. You want them to get the “full affect” when they walk in!
STEP 10 - KEEP CALM & CARRY ON
Ceremony or reception outdoors? Remember to have a back-up plan if it happens to be wet weather. Take your helper team through this option, too! You can never be too prepared.
Although you can plan everything down to the second, it’s important to remember that things WILL change on the day. Prepare yourself for these moments – just keep calm, it’s easy to remain flexible without having to compromise the look :) Remember… there’s always a solution.
Need helpers or further advice?
No worries! Our team are experienced stylists and have been through it all! Contact us with any questions - we’re always here to help you on your journey


